Windsor Earl Grey – Sage Vodka!

I stopped by my local wine and spirits store today and was introduced to a new vodka that is perfect for fall.  So of course I needed to buy a bottle and attempt some cocktails.  The vodka is from EG Spirits and is called Windsor.  It is vodka flavored with Earl Grey tea and Sage.  Here is a link to the website:  http://www.egspirits.com/spirits/windsor-2/

When I first smelled this vodka, I was hit with a strong sage smell, but as soon as I tasted it, the Earl Grey tea flavors came through.  I personally like Earl Grey tea as it is flavored with Bergamot Orange.  The combination of these two aromas is wonderful.

I decided to try a simple cocktail first, with just the Windsor vodka and a splash of Orange Bitters.  Thinking that the Orange Bitters would accent the Earl Grey flavors of the vodka.  I put 1.5oz of vodka in a cocktail shaker, added about 4 good dashes of orange bitter, added ice and shook it.  After pouring it into a martini glass I tried it.  Yumm, it tasted very good.

Next I wanted to make a more fall-like concoction, so I repeated the recipe above, but added a small amount of pure maple syrup.  It seems like it was about 1/4 of a teaspoon.  Then shook it up with some ice.  The maple syrup made the drink much smoother, and gave it just a hint of maple flavor.

Now for dinner we happened to be having some fall squash, and this cocktail went really well with the squash, surprisingly well.

For fun I also tried making a simple vodka tonic using the Windsor Earl Grey and Sage vodka.  I also was delicious.  The flavors in this vodka are very good, but fairly subtle, so adding it into something like a vodka tonic will let it shine, but if you add it to a bloody mary, it will probably be lost.

If you can find the EG Windsor Earl Grey and Sage vodka, I highly recommend it.  If you come up with fun recipes using it, share them in a comment.  Cheers!

Tim


Advertisement

Maple Spiced Salmon

Over the weekend, I had a craving for some fish, so I stopped at our local Whole Foods and picked up a piece of fresh Coho Salmon.  We tend to eat salmon frequently, so finding new things to do with it can be challenging.  As you know from some of my previous posts, I am a big fan of the Urban Accents spice blends.  They have great flavor combinations so they make delicious meals fast and easy and we have several varieties in the pantry…

One of their products is the Vermont Grill Dryglaze.  The Dryglaze blends contain sugar which when put on top of meat that has been rubbed with oil, melts, forming a glaze.  They also contain a variety of spices.  The package warns you to avoid direct heat, as the sugar burns easily.  The Vermont Grill blend contains Maple sugar, plus pepper, sage, ginger, paprika, fennel, thyme and nutmeg.  I have used this blend before and it gives the meat just a slight maple flavor and a nice savory taste.  I wanted to have a little stronger maple flavor, so I decided to modify things a little.

First I rinsed off the salmon filet and patted it dry with a paper towel.  Next I rubbed the salmon generously with some olive oil.  Then I poured about 4 tablespoons of pure maple syrup on the salmon.  We use the pure maple syrup rather than Aunt Jemima or other syrup substitutes, it just has a better maple flavor.  Finally I coated the salmon with the Vermont Grill Dryglaze and let it sit for about 20 minutes.

Now normally I would grill this salmon since clean up is easier and I like the smoky flavor you get on the grill, but it happened to be raining in Maryland that day, so I had to cook it in the oven.  Our oven has a Roast setting which is a combination of bake and broil, so I used that for the salmon.  It only took about 15 minutes at 350 degrees for it to cook.

I served this along with some fresh corn on the cob and it made a great Sunday night meal.

As for the wine, in case you have missed some previous posts, nothing goes with salmon quite like a Pinot Noir.  It really is a match made in heaven.  In fact that might be why we have salmon so much, hmmmm.  Anyway, I pulled a 2005 Dehlinger Goldridge Pinot Noir to go with this dish.  I wanted a pinot that had great earthy flavors, but was not too overdone.  What does “overdone” mean?  Well, some American winemakers make Pinot Noir in a big, rich, over-extracted way, to more closely match the tastes of their consumers.  I didn’t want the wine to overpower the flavors in the salmon, so I wanted a lighter style.  The Dehlinger wines are a bit lighter in style and a wine with 7 years of age has lost some of the “baby fat” that they have at release.

The salmon was exquisite!  It had a definite maple flavor, but also nice savory sub-flavors.  It also seemed like the syrup kept the salmon moist.  The crust or outer edge of the salmon was sweet and when eaten with the inner meat was just perfect.  The wine also hit the mark and complimented the salmon but still let you enjoy the great flavors.  Definitely a recipe to make again, just in case we have more salmon…

Give it a try and let me know what you think.

Tim


Grilled Whole Yellow Snapper with Prosciutto Wrapped Asparagus

Well that title certainly sounds fancy and complicated doesn’t it, but it’s not really.  It is also less of a planned meal and more of a “we have this in the refrigerator and I have a craving for that” meal.

To start with, I have  been cooking whole fish on the grill for a couple of years now.  I got the bug during a trip to South Beach in Miami where I had a whole grilled Yellow Snapper and it was SO GOOD, that I had to try it at home.  It was intimidating the first time, but really was not that difficult.  So I thought it would be a good thing to post here and perhaps give someone else the confidence to try it.

Now in addition to the cooking challenge of getting the fish done without burning it, you have the YECH factor.  There are a lot of people that have trouble seeing and handling a whole fish.  And that can get worse when it comes off the grill…  But there are ways to get around that too, so here we go with my tips for cooking a whole fish on the grill.

The first step is to acquire the fish.  The advice I always see in cooking magazines and online is that “the fish should look and smell fresh”.  Great, what exactly does that mean?  Well, the eyes should be clear, not cloudy, and it should look firm not “old”.  But the best test is the smell.  Remember it will still smell like fish, but it should not smell like fish that has been sitting in the trash can overnight.  I’m sure you can imagine that smell.  And of course there are lots of variations in between.  I find it best to go with you gut.  If it looks and smells good, go for it.

The second step in acquiring the fish is to have it cleaned.  Most fish shops and fish counters will do this for you.  This involves them removing the fish’s “plumbing”, scales (if not already removed), extra fins, etc..  They will also remove the head for you if you would prefer not to look at fish eyes during your dinner.  Once cleaned, your fish is ready for dinner prep.

In terms of quantity, I usually get 1 fish per person for small to medium-small sized fish (think trout, branzino, etc.).  For larger fish that are medium to large (like rockfish, snapper, etc.), I usually get 1 fish for 2 people.

I use a wire fish basket to cook the fish on the grill.  It lets the fish get some direct heat, but holds it together on the grill.  I start by rinsing the fish off, outside and in.  Then pat it dry.  I read somewhere that cutting a couple of slits in each side of the fish is a good idea, so I do that also.

Next I rub the fish, inside and out with olive oil.  I like to use a lemon olive oil to add some extra flavor to the fish.  I also slice a lemon into thin slices to place on the outside of the fish.  This helps protect the meat and give it a little lemon flavor.

I pull some herbs from the garden, usually some mixture of oregano, thyme, marjoram, savory, tarragon, etc.  Nothing really strongly flavored.  I rinse and dry the herbs, then stuff them inside the fish cavity (where the plumbing used to be).

First I give the fish basket a spray of oil, to keep things from sticking.  Next I place some lemon slices and herbs on the wire fish basket, then place the fish on top of them.  I add lemon slices and herbs onto the fish, then close the basket.  It should look something like this:

Now it is time for cooking.  I preheat the grill and before putting the fish on, adjust the heat.  In the area where the fish will sit, I turn the heat down to low.  The other burners I set to medium.  I find that using indirect heat lets the fish cook all the way through without burning and charring it.

I try to only flip the fish once, twice maximum.  Each time you flip it, you have a chance that a chunk will break off and fall into the grill, so try to limit the flipping.  Telling when the fish is done is a little tricky.  I usually take a small knife or fork and pry open the fish a little to see if it’s cooked through.  When it’s done, it should be flaky and opaque.

Be careful when pulling the fish basket off the grill.  Even though it has a handle, I have some burn marks from touching part of the wire basket.  I find that the fish comes out of the basket easier if you let it sit for a short time, maybe 5 minutes.  It is also easier if you sprayed the basket with oil.

I always try to filet the cooked fish on the plate, cutting the meat off the bones.  But it never works out very well for me, and I end up pulling off chunks and serving those.


Prosciutto Wrapped Asparagus

This dish is a great appetizer, but we had some Prosciutto and I had a craving for a salty vegetable to go with the sweet mild fish, so a dinner idea was formed.  This is really easy to make too, and can be made on the grill with the fish.

First you clean and trim the Asparagus.  I usually trim off the bottom third of the stalk where it is most tough and woody.  I put the Asparagus into a glass microwave safe dish, cover with plastic wrap and cook for 1 minute, 30 seconds.

If you have more Asparagus or thicker ones, you may need to cook them a little longer.  The goal is to only cook them slightly, leaving them still firm.  Once they are done, you need to let them cool down.  You are also going to need some toothpicks (I usually break them in half).  And you need some Prosciutto cut into thin strips.

Once the Asparagus is cool enough to work with.  Take each stalk and wrap a piece of Prosciutto around it (like a candy cane stripe).  Secure both ends with toothpicks and set it aside.

When you are done, place them carefully on the grill.  You need to watch these closely so that the Prosciutto does not burn.  You also need to rotate them trying to get all 4 sides some grill time.  Once they are browned, pull them off the grill.

These are good by themselves, providing a smoky, salty flavor to the Asparagus.  They are also good with a dipping sauce, such as an Aioli.  And as I mentioned, they make a great party appetizer.

So how did this odd meal turn out?  Well the fish was really good.  Yellow Snapper is a light fish, but it actually has some flavor.  And the lemon, herb combination plus the smoky grilling made for an excellent taste.  The Asparagus was also very good.  Having a little salty flavor with the fish was a good pairing.  I would definitely do it again.

For a wine paring, I picked out the Villa Creek 2010 White.  It is a blend of 65% Grenache Blanc, 30% Roussanne and 5% Picpoul Blanc.

This is typically called a Rhone White, because white wines with some mixture of Grenache Blanc, Roussanne, Viognier and Marsanne are made in the Rhone Valley in France.  These wines are really good with food.  They have wonderful flavors like peaches and honeysuckle, and usually are not as oaky as a Chardonnay.  The versions from California, particularly the Central Coast area are very good and reasonably priced.  The sweet, fruity flavors of the wine paired really well with the fish and were a nice compliment to the salty Asparagus.

I hope with the pointers in this post you will take a shot at cooking a whole fish at home.  It is very good, and makes for an impressive presentation at the table.  If you do, let me know how it goes and pass on any pointers!

Tim


Salted Caramel Ice Cream

I have had Salted Caramel Ice Cream several times, and have always loved it, so I wanted to recreate it at home.  So I went looking for a recipe.  Jeni’s Ice Creams made in Columbus, OH makes a really good one and she has a cookbook that tells you how to make it.  Perfect!  I’ll do that one!  But honestly it sounded too complicated to me.  So I searched the Internet for a recipe.  I found one on the Food Network website, but again, it looked really complicated.  There was one on the Epicurious website that looked complicated too, but less so than all the others.  It was the easiest I could find.

Now normally I am an adventurous cook, and will try anything.  In fact, I regularly make something for the first time when hosting guests.  I usually have no fear when it comes to cooking.  But this Salted Caramel Ice Cream seemed intimidating.  You had to “melt” sugar, brown it, then pour cream into this melted sugar stuff with all the recipes warning “it will splatter”.  I was nervous.

I followed the Epicurious recipe exactly.  Here is the link to the original, though I am going to re-quote it here to give you some tips.  I hope Epicurous doesn’t think I am stealing their recipe.

http://www.epicurious.com/recipes/food/views/Salted-Caramel-Ice-Cream-354517

  • 1 1/4 cups Sugar, divided
  • 2 1/4 cups Heavy Cream, divided
  • 1/2 teaspoon flaky Sea Salt
  • 1/2 teaspoon pure Vanilla Extract
  • 1 cup Whole Milk
  • 3 Large Eggs

Heat 1 cup Sugar in a dry 10-inch heavy skillet over medium heat, stirring with a fork to heat sugar evenly, until it starts to melt, then stop stirring and cook, swirling skillet occasionally so sugar melts evenly, until it is dark amber.

This was the step that seemed the most difficult to me.  If you messed this up, the whole dish was ruined.  So I did exactly what they said, almost.  As the sugar began to melt (it actually melts!), I kept stirring.  What happens is that the molten sugar attaches to the fork, then cools and hardens, making clean-up a pain.  So stop stirring when the sugar starts to melt.  Also, this is like making a Roux.  The longer you cook it, the darker (and more burnt tasting) it becomes.  So I stopped when it was a “light” amber, knowing that it would cook a little longer off the heat.

Add 1 1/4 cups cream (mixture will splatter) and cook, stirring, until all of the caramel has dissolved.  Transfer to a bowl and stir in sea salt and vanilla.  Cool to room temperature.

They don’t lie, this splattered!  And mixing the caramel and cream seemed like a forced marriage for the first few minutes, but it got easier and soon was a nice brown color.  I used some Cyprus Flake Sea Salt since it was the “flakyest” I had on hand.  I was tempted to put the mixture in the refrigerator to speed up the cooling process but resisted the urge.  That worked, because the other stuff took a little time to make.

Meanwhile, bring milk, remaining cup cream, and remaining 1/4 cup sugar just to a boil in a small heavy saucepan, stirring occasionally.

This was straight forward, and a welcome easy step compared to the Caramel preparation.

Lightly whisk eggs in a medium bowl, then add half of the hot milk mixture in a slow stream, whisking constantly.  Pour back into saucepan and cook over medium heat, stirring constantly with a wooden spoon, until custard coats back of spoon and registers 170 degrees on an instant read thermometer (do not let boil).  Pour custard through a fine-mesh sieve into a large bowl, then stir in cooled caramel.

The first part was easy, but once I got the mixture back in the saucepan, it didn’t go as planned.  First, I didn’t have a wooden spoon, just a plastic (heat resistant one), and it seemed that the mixture coated the back of the spoon upfront, so that was no help.  After cooking for a short time, my thermometer read 150 degrees, but the mixture was bubbling like it was boiling, and getting thick.  So I pulled the mixture off the heat.  I used a big strainer to pour the mixture through and was surprised at the big chunks of stuff that were left, but what went into the bowl looked even better.  I had to “mush” the mixture through the strainer at the end to get all of the liquid out.

Chill custard, stirring occasionally, until very cold, 3 to 6 hours.  Freeze custard in ice cream maker (it will still be quite soft), then transfer to an airtight container and put in freezer to firm up.

I put the custard into the refrigerator and stirred it every hour, and it stayed there for a good 6 hours.  We have a 2 Quart Cuisinart Ice Cream maker, so I used that to churn the Ice Cream.  It took about 25 minutes until the Ice Cream Maker was struggling and the mixture looked “firm”.

I extracted the ice cream and put it into a plastic container and put it into the freezer overnight.

We had some for lunch the next day, and WOW, it was outstanding!  A wonderful toasty caramel flavor, with a slight salty flavor.  But sweet and creamy too.  I put some Marshmallow Cream on mine, but it didn’t really need anything.  It was just so good by itself.

So the ice cream was good, but even better was the lesson that a recipe that looks difficult might not be so hard after all.

OK, no the ice cream was better than the life lesson….


Tim


Pacific Spice Vinegar with Tomatoes and Beans

I stumbled across a store in Bethesda, MD called Secolari Artisan Oils & Vinegars a few weeks ago.  They have an incredible assortment of Olive Oils, Vinegars, and Pastas many with unique flavor combinations.

Their website is not functional yet, but here is the link:  http://secolarievoo.com/

I tasted through most everything in the store and found several things I liked, including a vinegar called Pacific Spice.  It is sweet and spicy with a very unique flavor.  The tag in the store says it contains Kiwi and Chili Pepper with Ginger, Citrus and “Secret Spices”.  I used it mixed with some Greek Olive Oil to dress some Arugula and it was very good, but I thought it had potential as an ingredient in a dish.

I had a piece of Rockfish that I was going to grill for dinner and I wanted a side dish to go along with it, but it needed to be something I could use this Pacific Spice Vinegar in.  So I made this Tomato and Bean dish…

  • 2 cans Cannellini Beans drained
  • 1 package small Grape Tomatoes cut into chunks (mine were a mix of yellow and red)
  • 1 medium Vidalia Onion chopped
  • 5 cloves of Garlic chopped fine
  • 12 Basil leaves roughly chopped
  • 4 Tablespoons Pacific Spice Vinegar (could substitute Tarragon Vinegar or White Wine Vinegar)
  • 2 Tablespoons Olive Oil

In a large, oven-proof pan, I added the Olive Oil and set the heat to medium-high.  When the oil was hot, I added the onions and cooked, stirring frequently until they were translucent.

Next I added the garlic and cooked it, stirring to keep it from burning for about 3 minutes.  I added the Cannellini Beans and mixed them together with the onions and garlic.

I heated this mixture for about 5 minutes to cook off some of the bean liquid.  Next I added the Tomatoes and mixed them gently into the bean mixture.  I let that cook down for about 3 minutes, then added the Basil leaves.

I heated this mixture for another 3 minutes, then added 2 Tablespoons of the Pacific Spice Vinegar.  I pulled the pan off of the burner and put it into a preheated oven set at 400 degrees.  I left the pan in the over for about 6 minutes or until the mixture dried out a little, then removed it from the oven (careful it will be hot).  I poured in the remaining 2 Tablespoons of vinegar and stirred it in.  I let the mixture sit for a good 5 minutes before transferring it to a bowl.

This normal bean and tomato mixture really came to life with the vinegar.  It had a little heat, it had a little sweetness and it was just really good.  We ate every drop of it.  And it was really good with a simple grilled rockfish filet.

Since you may not find Pacific Spice Vinegar unless you live in Maryland, you might try Tarragon Vinegar, it seems like it would be a good substitute.  Give it a try and let me know what you think.

Tim


The Great Power Outage Feast

On Friday evening, 6/29, eastern Maryland was hit by a fierce storm, knocking out power and tree limbs in the area, and at my house in particular.  Of course the temperatures were in the mid-90’s, making it an even more pleasant experience.  So with such warm temperatures and no power, things in the freezer began to thaw out.  By the time power was restored on Monday 7/1, we had some meat that had to be eaten before it went bad.

I had purchased a Buffalo Flank Steak (Whole Foods I believe), which was half thawed, so that was on the menu.  I also had a Duck Breast which was mostly thawed, so Buffalo and Duck for dinner, oh and maybe a vegetable too…

Now after being without power for a few days, and spending most of those days clearing limbs, sticks and leaves from the yard in the hot sun, I was a little tired, so my first thought was, “let’s just cook them”.  But I had purchased those 2 items with specific intentions and I hated for them to be wasted.  I also realized it has been a while since I’ve posted something, so I thought a power outage feast post was in order!

Buffalo Flank Steak with Avocado

I had purchased a DryGlaze mix from Urban Accents (my favorite spice blends).  It is called Vermont Grill and features Maple and Sage.  I have used this on Salmon before and it is really delicious, but I wanted to try it on some beef.  I had thought that the Buffalo Flank Steak would be a good option to try it on.

Here is the link to the Urban Accents Vermont Grill DryGlaze:

http://www.urbanaccents.com/Dryglaze-vermont-grill-dryglaze-p/4131.htm

Using the DryGlaze is really easy.  Coat the meat with Olive Oil, then sprinkle on the DryGlaze mix.  Place it into a plastic bag and let it sit.  By the way these are the directions on the package, so nothing special here.  After about 30 minutes, the mix has formed a “glaze” on the meat as the sugar has melted with the oil.

I pulled the meat out of the bag and placed it on the grill.  Now with all of the sugar in the DryGlaze, you should avoid high direct heat as it will burn.  So I put the burner under the meat on low, set the other burners to medium and closed the lid.

When the meat reached 130 degrees (medium rare), I pulled it off the grill, tented it with foil and let it sit.

Now this Vermont Grill DryGlaze may be sweet with a maple flavor, but it also packs a little heat (from past experience), so I wanted something cooling to eat with the flank steak.  I took an Avocado, peeled it and placed it in a bowl.  I mashed up the Avocado with a fork until it was a paste.  Next I squeezed the juice from half of a Lime into the Avocado and mixed it up.  I also added a little salt and pepper for taste.  This wasn’t a very complex accompaniment, but I was hoping it would tame the heat a little bit.

Duck Breast with Cherry Sauce

At a beer tasting a few months ago, I tried a Belgium ale made with Cherries called Liefmans Cuvee Brut.  It was a little sweet for a drinking beer, but I imagined it would be great to poach a duck breast in.  So I bought a bottle along with a duck breast planning to make it one day.

I prepared the duck breast by making several cuts in the fat side of the meat.  This allows the fat to escape I assume.  I also coated the meat side of the duck breat with some Thyme and some Savory leaves along with a little salt and pepper.

In a frying pan I poured about a quarter inch of the Liefmans ale and started heating it over medium heat.

Once it began to steam, I placed the duck breast in the pan, fat side down.

This time I placed a splatter screen over the pan, after my last duck breast experience when it splattered everywhere.  I cooked the duck breast for about 5 minutes, then turned it over to cook the meat side.  The ale had begun to evaporate, so I refilled the pan to a quarter inch of ale.  After another 5 minutes I flipped the duck breast again and added more ale to the pan.  I did this a couple of more times until a meat thermometer registered 130 degrees (medium rare), then pulled the duck breast out, tented it with foil and let it sit.

The frying pan had a little of the ale left along with some duck fat.  So I added a little more of the cherry ale, then added 3 tablespoons of Cherry Preserves, stirring over medium heat to incorporate it into the sauce.  I brought the sauce mixture to a boil, reducing it slightly.  Next I added 2 tablespoons of Balsamic Vinegar to the sauce and mixed it in, again reducing it slightly.  I pulled it off the heat and poured it into a small pitcher.

The Results

The Buffalo Flank Steak was really good.  It was leaner, more tender and more flavorful than any beef flank steak I have ever had.  The Vermont Grill DryGlaze did not really show up however.  I barely tasted any of the Maple flavoring which was disappointing.  The Avocado accompaniment was a nice change of pace with the meat though.  Very refreshing after a hot couple of days.

Wow!  The Duck Breast was fantastic!  Cooking it in the ale kept it nice and moist and gave it a slight cherry flavor which worked really well with the dark duck meat.  The sauce was the real star however.  It was great by itself, it was great on the duck, it was even good on the Flank Steak!  The duck fat and Balsamic added an earthiness and savory flavor to the sweetness of the cherry preserves and cherry ale.  I could pour that sauce on anything.  Definitely a keeper of a recipe.

The Wine

This meal had a lot of flavors going on, so it was going to be a little challenging to pick a wine.  I wanted something fruity and juicy to go with the fats in both meats.  The cherry sauce was going to be the most dominate flavor of the meal, so I needed to be sure the wine would stand up to that too.  So I decided to go with a California Zinfandel which can be very fruity and jammy.  They also sometimes have a “brambly” character which I thought might pair well with the Flank Steak.  I picked a Neal Zinfandel from Napa Valley.  The Neal family makes really good wines that are remarkably affordable for Napa Valley wines.  I find their wines show the characteristics of the grape without being overdone.  Some Zinfandels can be so over-extracted that they are almost like syrup, which was not what I wanted for this meal.

The Neal Zinfandel went really well with the duck and cherry sauce and was also good with the flank steak.  I probably could have poured a Cabernet Sauvignon with the flank steak and it may have paired better, but the Zinfandel worked too.

The Power Outage Feast was a complete success!

Tim

Flank Steak with the Elusive Aji Sauce

A couple of years ago, I made a recipe from Bon Appetit for Flank Steak with Aji Sauce.  It was terrific!  Unfortunately, since then I have tried recreating that Aji Sauce several times with no luck.  Perhaps we just had too much wine that night.  But the same recipe has yielded completely different results every time.  So of course I have been trying to recapture that magic with the Aji Sauce ever since.

Now to be completely honest, the version in this post is not exactly the magic I remember, but it is the closest so far.  So I’m posting it in the hope that someone else will have better luck than I (and share their recipe!).

Here is a link to the original recipe from Bon Appetit:

http://www.epicurious.com/recipes/food/views/Beer-Marinated-Flank-Steak-with-Aji-and-Guacamole-353782

Scroll down in the recipe and click on the Aji Sauce link.

Now Bon Appetit included this Aji Sauce as part of a Colombian meal.  I found several references online claiming that Aji Sauce was a staple of Peruvian cuisine.  The recipes are all quite different, but overall, it seems that Aji Sauce is similar to the Argentinian Chimichurri sauce.

The problem with the Bon Appetit recipe is the onions.  If you follow the recipe exactly, it tastes like onion sauce.  I have tried using only mild, sweet onions – same result.  I tried reducing the onions by half – same result.  For this recipe I dropped the onions completely and it was much better.  The essence of the Cilantro and the Jalapeno with the Lime juice was a nice accompaniment to the meat.  Here is the recipe I used:

Aji Sauce

1 bunch of Cilantro – destemmed

2 Jalapeno Peppers – cored and seeded

Juice of 1 Lime

Sea Salt

2 TBL Olive Oil

I placed the Cilantro, Jalapeno and Lime Juice in a food processor and processed them until they were smooth.  Then I added a couple of pinches of Sea Salt and about 2 Tablespoons of Olive Oil.  I played a little with the Salt and Oil until it tasted right.  Then I put the Aji Sauce in a plastic container, covered it and put it in the refrigerator so the flavors would meld together.

Flank Steak

Flank Steak is very good, but sometimes it can be a little tough.  So I usually take a service fork and “stab” it all over several times to break up the fibers in the steak (this is also a great stress reliever – but do be careful).  Next I rub the meat with Olive Oil on both sides, then add the seasoning.

For this Flank Steak I decided to use an Urban Accents blend called Mesa Rosa Chipotle.  It is a little spicy and has that wonderful Chipotle flavor.  I wanted something spicy to go with the cooling and refreshing flavors of the Aji Sauce.  I coated the Flank Steak with the seasoning and let it rest.

I prepared the grill and when it was hot, put the Flank Steak on the grill.  I typically use the initial heat of the grill to sear one side, then flip the meat to sear the other side.  I generally cook red meat until a thermometer reads 130 degrees (the lowest level of Medium Rare).  I then pull the meat, cover it and let it rest.  This helps the meat retain it’s juices and it finishes up cooking.

The best way to cut a Flank Steak is “with the grain”.  This gives you the most tender results.

Serve the Flank Steak with the Aji Sauce.

The Wine

Now, not many wines go as well with beef as a Cabernet Sauvignon.  The fat in the meat is offset by the Tannin’s in the red wine.

What is Tannin you ask?  Well, think about a time when you were having tea, and you let the teabag sit in the water too long.  Remember that drying sensation in your mouth?  That is Tannin.  Tannins come from the grape skins, which are left soaking in red wines during the wine making process.  They are important to the aging potential of a red wine.

So I picked out a 2005 Behrens & Hitchcock Cabernet Sauvignon #13 from Napa Valley.  I wanted a wine that still had some good fruit flavors, but that had mellowed a little with age, so a 2005 seemed about right (just a guess but it worked out).

The Verdict

Well first off, the steak and the wine went really well together.  The spicy seasoning on the steak stood up to the strong fruit flavors of the wine.  The Aji Sauce was much better than my last attempt.  However, the Lime juice was a little overwhelming.  Next time I think I would start with the juice of 1/2 of a lime, then add more gradually until it tasted right.  The Cilantro flavor also was a good match with the spicy flavors of the meat and worked somehow with the wine.  I also might add back in just a little chopped onion, maybe just a small bunch of green onions.  Whatever onion additions I do however, will start with just a little, adding more as I go along.

Overall, as close to the original Aji Sauce magic as I have come so far.  But I will keep trying.  You should too, and let me know if you find the magic combination – then share!

Tim

Salmon with Smoked Paprika and Preserved Lemons

This is one of my most favorite dishes, and it is a regular meal in my house, at least once every couple of weeks.  It is fast and easy to make and is at it’s best when there is fresh salmon at the market.  The flavors are so good and it pairs really well with wine, particularly a Pinot Noir.

I start with a good piece of salmon.  I ask the person at the fish counter (a fish monger perhaps) for the “top part” of a fresh looking salmon filet.  I find that the “top part” is more uniform in thickness, so it cooks more evenly.  If you have the “tail” section, it gets really thin at the end, while the “mid” section is thicker.  So you generally overcook the thin side trying to get the thicker section done.  I generally have better luck with “Fresh” salmon versus “Previously Frozen”.  I also find that the more fat in the salmon, the better the dish is.

The Salmon

For this meal I picked a King salmon filet that was fresh and farm raised.  The only reason being that it looked the best and most fresh of the salmon in the case.


First I rub the salmon with a lemon olive oil.  I found a really good one produced by Agrumato at an Italian market that has amazing lemon flavor.


Next, I coat the salmon with smoked paprika.  Coat is the key word here, I literally cover the salmon in smoked paprika.  I personally like the flavor of smoked paprika and for me more is always better.  If you have never tried smoked paprika, you must.  It is only slightly spicy, like normal paprika, with a nice lightly smoky flavor.


Preserved Lemons are made by curing lemons with salt for several days.  It seems to be a fairly easy process, though I admit that I just buy them at a local Whole Foods Market.  If you want to try making them, here is a recipe from Simply Recipes:

http://simplyrecipes.com/recipes/how_to_make_preserved_lemons/

I take a Preserved Lemon and slice it, placing each slice on the salmon so that it is covered.

I also sprinkle the salmon with a smoked sea salt.  I use either Alderwood (Salish) or Applewood (Yakima) smoked sea salt.  Both Alderwood and Applewood are used to smoke salmon in the Pacific Northwest and both add a great nuance to salmon.

I place the salmon on a piece of foil and place it on the grill over medium heat.  The amount of time on the grill depends upon your grill and the thickness of the salmon.  I generally cook it until fat starts to form on the top of the fish (the white, thick creamy looking stuff).  Then pull it off and let it rest.


Asparagus with Tarragon

While the salmon was cooking, I prepared a side dish.  I trimmed some asparagus spears and placed them in a glass baking dish.  I sprayed them with olive oil and sprinkled dried Tarragon leaves on them.  I covered the dish with plastic wrap and placed it in the microwave.  I cooked the asparagus about 6 minutes total.  Stopping at 3 minutes to check them.  I like the asparagus to still be a little firm and crisp when they are done.


The Wine

One of the worlds great wine and food pairings is salmon with Pinot Noir.  These two flavors go great together.  If you want to try a Pinot Noir, try it with salmon and you will fall in love.  I picked out a 2006 Kosta Browne Pinot Noir from the Sonoma Coast.  The Sonoma Coast is an area north of San Francisco and West of Sonoma county.  It is a rugged area with lots of wind, cool temperatures and generally harsh conditions.  I find wines from the Sonoma Coast to have bigger flavors than wines from other Sonoma areas.  This wine was no exception.  It was fruity and complex with dark berry flavors, but with that unmistakable Pinot Noir flavor.  Pinot Noir typically has a fair amount of acidity (that feeling in your mouth when you bite into a lemon).  This acidity in the wine counteracts the oiliness of the fish, making them nice compliments to each other.


The Verdict

I have made this meal so often that it is really hard to mess it up.  The Salmon tasted great and was done just right, still moist and tender.  The addition of Tarragon to the Asparagus provided a nice compliment.  Tarragon has a slight anise flavor and somehow it worked really well with the Salmon and Smoked Paprika.  I also added a little more of the Alderwood smoked sea salt to the Salmon at the table.  The flesh of the Preserved Lemons gets a bit of a smoky flavor from the grill and the Smoked Paprika.  Eating a little of the lemon flesh with Salmon is also really good.  And the wine rounded out the meal just right.  A great meal.

I think you are going to love this dish.  Give it a try and let me know what you think.

Tim


Smoked Tri-Tip

Several years ago while living in Columbus, OH, we had a tradition called “Smokin Sundays”.  We would get together with friends, throw some type of meat on the smoker and drink wine until it was done, then drink more wine while we ate it.  It was always a great time, until Monday morning came around…

Some of those Columbus friends introduced me to a cut of beef called the Tri-Tip roast.  It is a triangle shaped piece of beef that you find at the bottom of the sirloin and usually weighs 1 to 2 pounds.  It is lean, tender and very flavorful.  The secret is to not overcook it since it can become dry and tough.  This is especially challenging because the “pointy” end is much smaller than the other end, so it is a balance to get both sides to an acceptable “doneness”.  But with a little seasoning or marinade and a quick flash on the grill, it is outstanding!

The Tri-Tip roasts cannot be found everywhere just yet, though as they become more popular they are beginning to show up in more grocery stores.  It is best to ask your butcher for one.  I have been finding them regularly at some Whole Foods markets here in Maryland.  They are also less expensive than many cuts of meat (usually just a little higher than a flank steak).

I was curious to see how a Tri-Tip roast would do with a slow smoking treatment, so I  decided to re-start the “Smokin Sunday” tradition here in Maryland, and smoke a Tri-Tip roast.  To pair with the smoked Tri-Tip, I wanted something cool like a simple potato salad and of course some wine.

Smoked Tri-Tip Roast

First, I started preparing the smoker.  I pulled out some maple wood chips and soaked them in water for about an hour.  I filled the smoker bowl with water and added about 3 large sprigs of rosemary.  Then I started the smoker (I have an electric smoker) and let it warm up for about an hour so the chips would begin to smoke.

I used a 2 lb Tri-Tip roast and rubbed it all over with olive oil.  Next, I coated the roast with San Juan Sazon spice blend from Urban Accents.

If you haven’t tried the Urban Accents spice blends, you should, they are amazing.  They have great flavor combinations and most blends do not include salt.  (I highly recommend the Bayou Barbeque on a ribeye steak!)  Here is the link to Urban Accents:

http://www.urbanaccents.com/

Anyway, the San Juan Sazon blend has a nice blend of sweetness and heat, with sugar, paprika, and turmeric, so I think it works well on smoked meats.

I let the meat sit for about an hour with the spice blend on it, then placed it on the smoker.  It took about 2.5 hours until the meat registered 130 degrees (medium rare) on a meat thermometer.  I pulled the meat off the smoker, tented it with some foil and let it sit for about 10 minutes.  Then I sliced it.


Potato Salad with Cilantro

While the meat was smoking, I prepared a simple potato salad.  I peeled about 6 Yukon Gold potatoes and cut them into 1/2 inch cubes.

I placed the potato cubes in a microwave safe dish, added a Teaspoon of water, some salt and pepper.  Then I covered it and cooked the potatoes in the microwave on High for about 10 minutes total, stopping every 3 minutes to stir the potatoes.  Once the potatoes were done, I drained them and let them cool.

I diced 1 small sweet onion  and added it to the potato mixture.

Next I took about 3/4 of a bunch of cilantro and stripped the leaves from the stems.  I minced the cilantro leaves and added them to the potato mixture.

I stirred about a cup of mayonnaise into the potatoes and mixed it in.  Everyone’s taste for mayo is different, so I usually add a little and mix it up, then try the potato salad.  I keep doing this until it tastes good to me.  I added a little more salt and pepper, covered it and put in the refrigerator until the meat was done.  I pulled it out when the meat came off the smoker so that it would warm up before serving.


Wine

Since the meat was smoked, I wanted a wine that had some “smokiness” to it.  You usually get that from the wine being aged in charred oak barrels.  The amount of smokiness depends upon the type of barrel and the level of “toast” on the barrel (how much it was charred before use).  I also wanted a wine that would pair well with the spiciness of the seasoning on the meat.  So I picked a Syrah.  Syrah wines have a spiciness to them and are usually sturdy enough to stand up to very flavorful food.  I picked a 2005 DuMol Syrah from Russian River.

The Verdict

The whole meal was just fantastic.  The meat had a wonderful sweet, smoky flavor with a little spiciness.  It paired really well with the wine too.  The potato salad offered a nice contrast to the meat.  I had never made potato salad with cilantro before, but I really like cilantro and it made the potato salad a little different.  It also helped it stand up to the strong flavors of the meat.  Overall a great meal and a wonderful way to restart Smokin Sundays.

Try out a Tri-Tip roast on the grill or a smoker and definitely check out the Urban Accents spice blends.  Let me know how it goes.

Tim


Shrimp and Grits

Growing up in the Midwest, I never had Shrimp and Grits.  I really do not recall even seeing it on a menu.  In fact I’m thinking that it would have probably been “Shrimp and Mashed Potatoes” in the Midwest.  But, since moving to Maryland several years ago and spending more time in the Carolinas, I have come across Shrimp and Grits and seem to order and enjoy them at every opportunity.  So I decided it was time to try and make it for myself.

This meal was also a good challenge to pair a wine with, more on that below.

For the Shrimp

  • 1.5 lbs Shrimp (peeled and deveined with tails on)
  • 3 links (a little less than a pound) of Andouille sausage chopped into small chunks
  • 1  Vidalia Onion minced
  • 1 Garlic clove minced
  • 2 tbl Olive Oil
  • 1/4 cup All-Purpose Flour
  • 2 cups Chicken Stock
  • 2 Bay Leaves
  • 1 tsp Thyme
  • 1/4 tsp Cayenne Pepper
  • 1/2 tsp Freshly Ground Black Pepper
  • Tabasco Sauce (about 4 shakes)

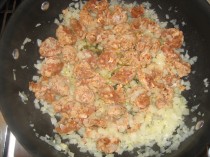
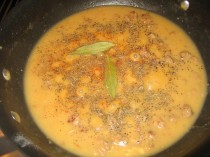
Heat the Olive Oil in a deep skillet over medium heat.  Add the onion and garlic and saute about 3 minutes until they soften.  Add the sausage and cook, stirring frequently until the sausage is brown.  Try to stir often enough so that the onions and garlic do not burn.  Sprinkle in the flour and stir  to create a roux.  Slowly stir in the chicken broth.  Once the liquid begins bubble, add the bay leaves, thyme, cayenne and black pepper.  Then add the shrimp and cook.  Be careful not to cook the shrimp too long or they will get tough.


For the Grits

I used Quick Cooking Grits (not Instant) and followed the package instructions.  The instructions called for water, but I substituted Heavy Cream for 2/3 of the liquid and Milk for the other 1/3.  I also added 2 tbl of Butter once the Grits were done (because butter makes everything better!).

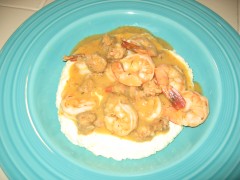
I put a mound of Grits in the center of a large dinner bowl, then ladled the Shrimp, Sausage, Sauce all over the Grits and finished it with a sprinkle of Sea Salt.

Beware that this is a dish where both things cook quickly and need to get done at the same time, so it helps to have a helper!

What Went Right

Yumm, this dish was good and wholesome!  There were layered flavors and a little heat but not too much.  I was full after one serving but couldn’t stop myself from having a second.

What Went Wrong

Lack of self-control.

What I Would Do Differently

I believe adding the spices (bay leaves, cayenne & black pepper, tabasco) earlier in the process, with the onions and garlic would have given the dish more flavor.  Also, I cooked the roux for only a few minutes, so it was a light brown color.  I will probably cook it a little longer, perhaps to a medium brown to give it a little more flavor.

Wine Pairing

This meal presented a unique wine paring opportunity.  On one hand, you have shrimp, cream and grits – all mild foods you would normally pair a white wine with.  But it also had the andouille sausage, pepper and tabasco, which would normally call for a spicy red wine.  So I decided to try both and compare the two wines to see which one went better with the dish.  Here are the wines I selected:

White Wine – 2010 Tablas Creek Vineyard – Patelin de Tablas Blanc – Paso Robles, CA.  This is a white Rhone blend containing Grenache Blanc, Viognier, Roussanne and Marsanne.  If you have not tried Rhone white wines from the California Central Coast, I urge you to check them out.  They are great alternatives to Chardonnay and much better with food (at least for my tastes).

Red Wine – 2008 Tercero Wines – Cuvee Christie – Santa Barbara County, CA.  This is a red Rhone blend containing Grenache, Syrah and Mourvedre.  These are typically called “GSM” wines and you see them from Australia, California, etc.  Again these are really great food wines and I find these wines from Tercero to be very drinkable and also a great value.  Check out their lineup here:  http://tercerowines.com/

I was expecting that one wine would stand out and that it would probably be the red.  However, both wines were really good with the dish.  The white provided a nice refreshment from the heavy and spicy flavors, cooling the palate.  The acidity and weight of the wine kept it from disappearing when taking a bite of the Shrimp and Grits.  The red really stood up to the flavors in the dish and added a nice fruity compliment.  The acidity and soft tannins paired particularly well with the andouille sausage.   Not able to choose one winner, we had to finish both bottles with the meal (oh the price of research!)  Further proof that there are no hard and fast rules in wine and that you should experiment to find flavors you like.

Give the Shrimp and Grits a try and let me know how it turns out!  And let me know if you find other wine pairings that you enjoy with it.

Tim